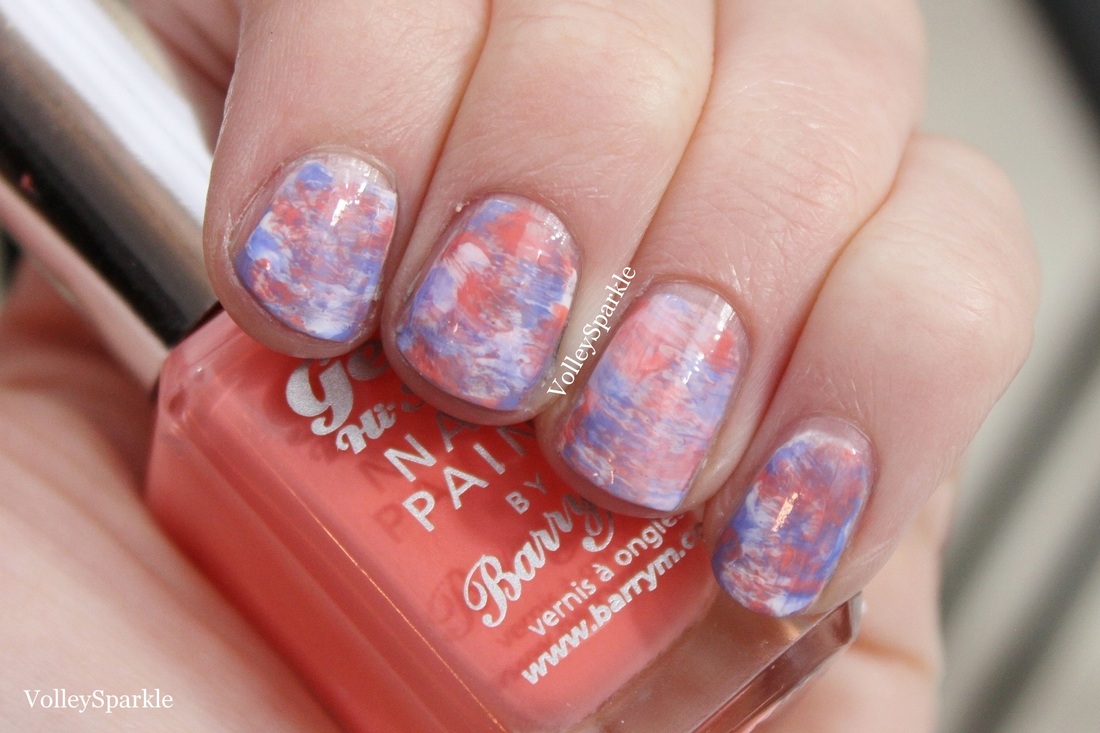
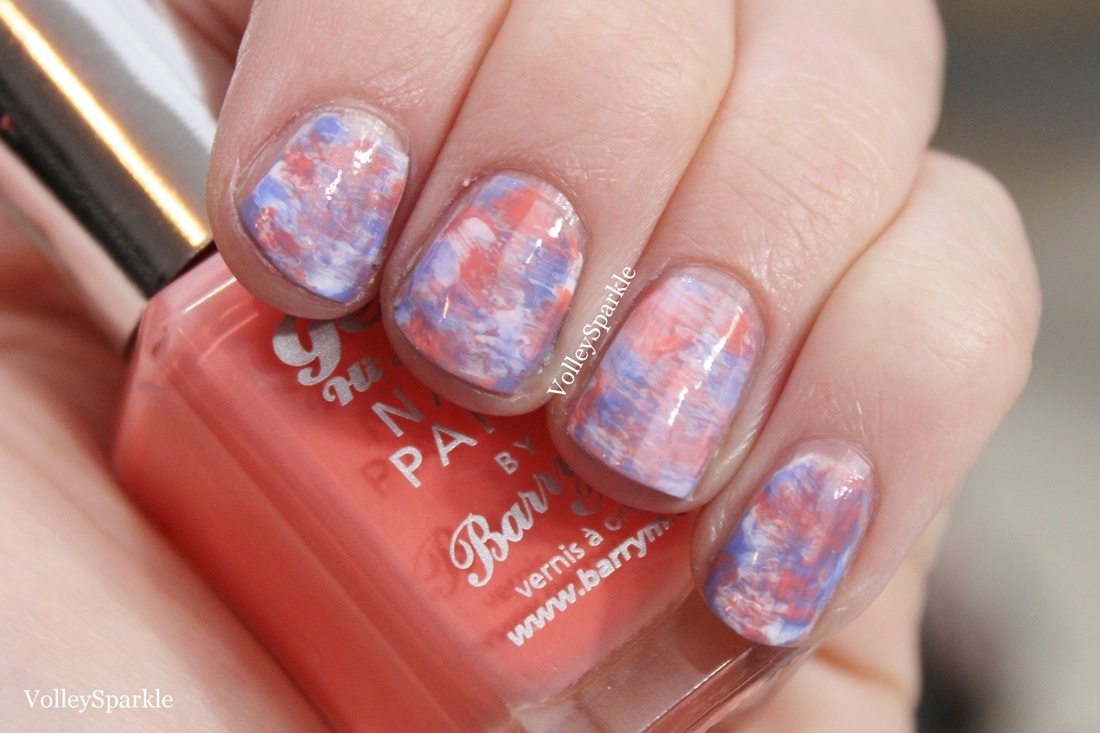
To begin this manicure, I applied a thin layer of a pale pink (Julie G Birthday Suit) to make sure none of my natural nails would be seen through the design. Once the base color had dried, I moved onto the marble look. I find this technique to be super easy, so I hope you give it a try! For the marble I used three colors, an orange (Barry M Jelly Hi Shine Papaya), a blue (Milani Power Periwinkle), and a white (Sally Hansen Xtreme Wear White On). For this technique, you want to wipe off most of the polish so that only a little remains on the brush. Then, paint fairly messy stripes on the nail. I first applied the blue, then the orange and then the white. To make the look more layered, I reapplied the blue and orange, making a total of five layers of color. Not too long after you apply the stripes, apply a thick layer of top coat (I used the Out The Door Top Coat) to blend the stripes together. This look didn't take too long to do and it's pretty fool proof! 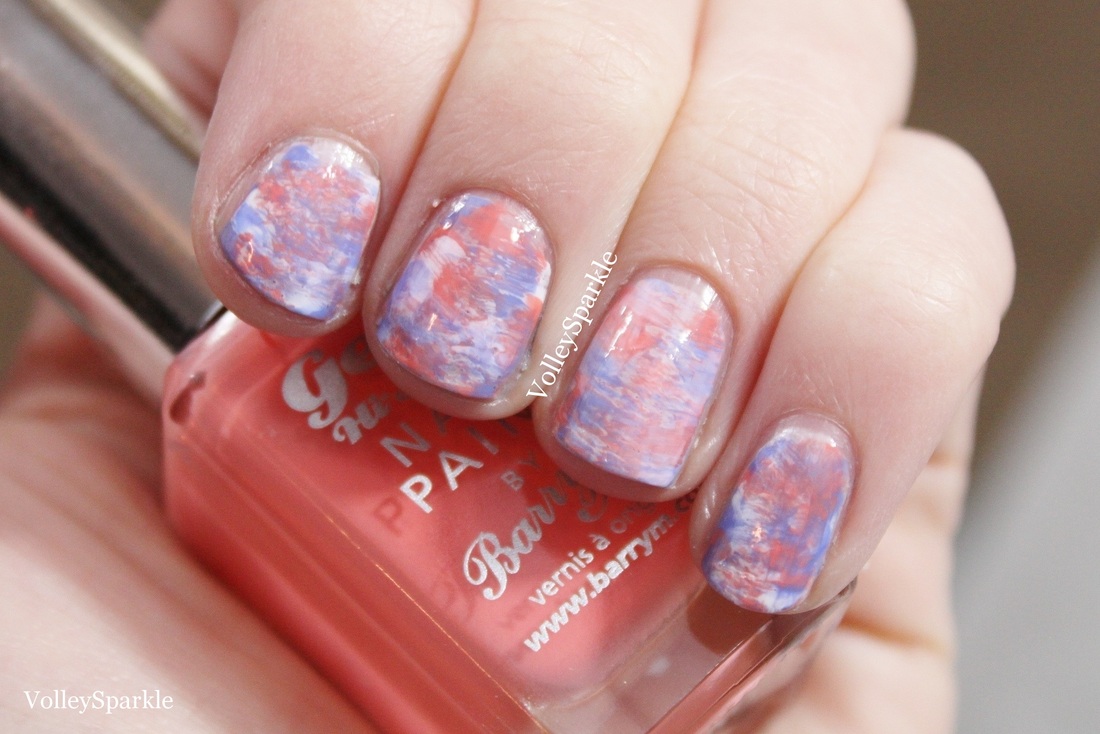

XOX ♥
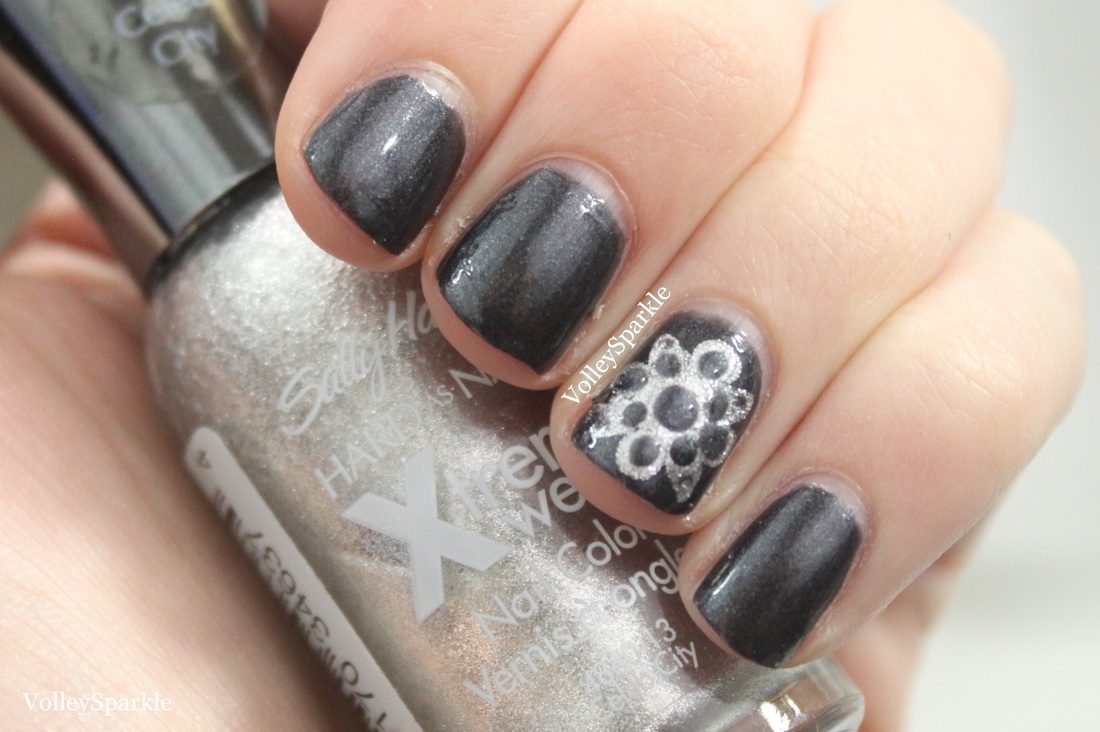 I started off with a dark grey base, Essie Over The Edge. Using a dark color as a base will really make the design pop. For the flower I used Sally Hansen Xtreme Wear Celeb City; I definitely suggest using some kind of reflective foil polish for the flower. For the flower design, I first created five large dots with the silver polish: one in the center, one on the top, one on the bottom and on both sides of the center dot. I used the small end of a dotting tool to create a triangle shape between each of the outer dots with the same silver polish. Once the silver dried, I used the grey color again to add detail to the flower. I added a dot in the center of each silver circle, as well as a smaller dot on each of the silver triangles. As always, I finished off with the Out The Door Top Coat. 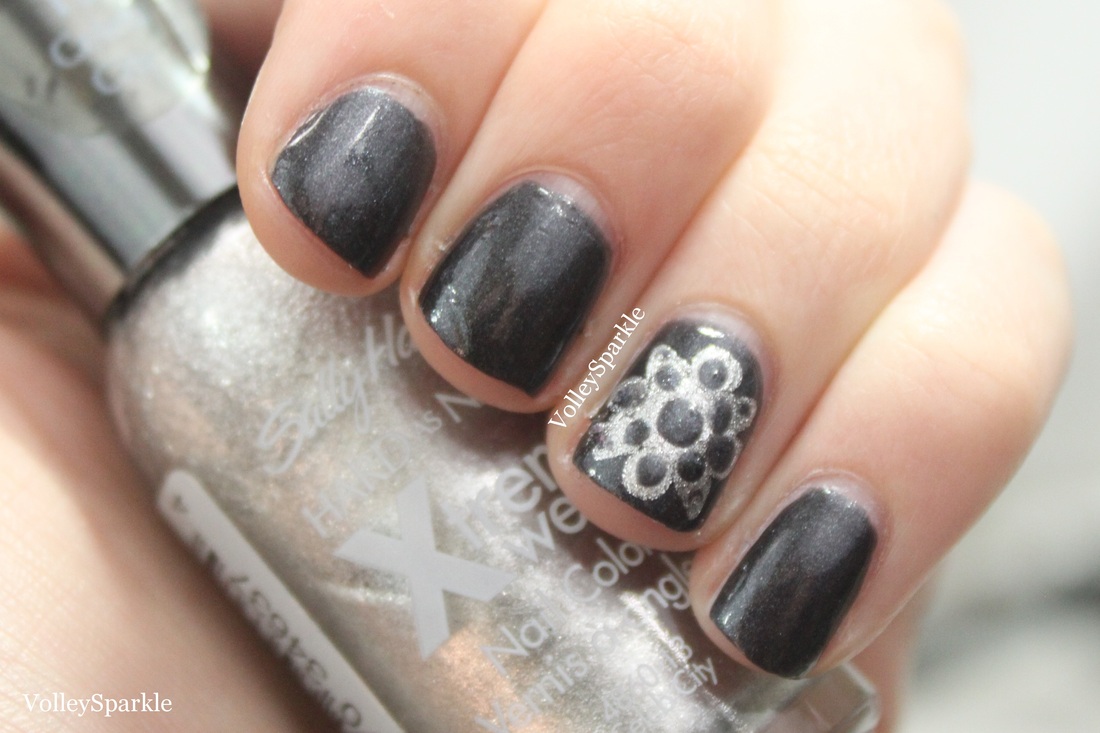 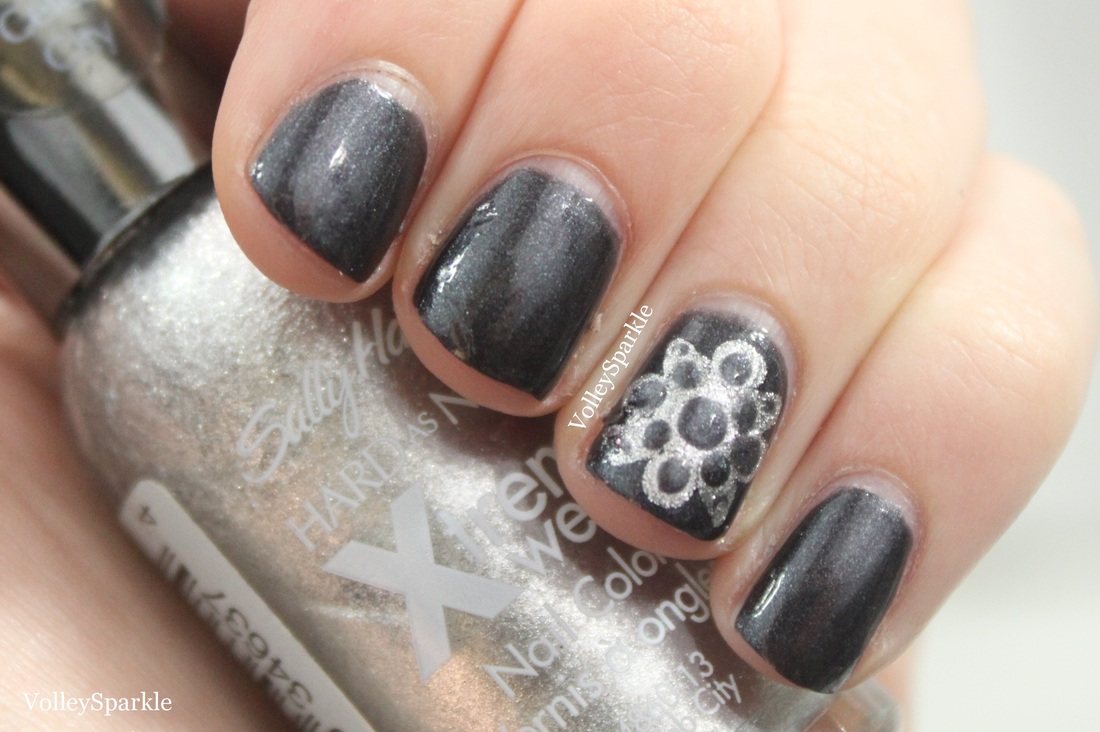 XOX ♥
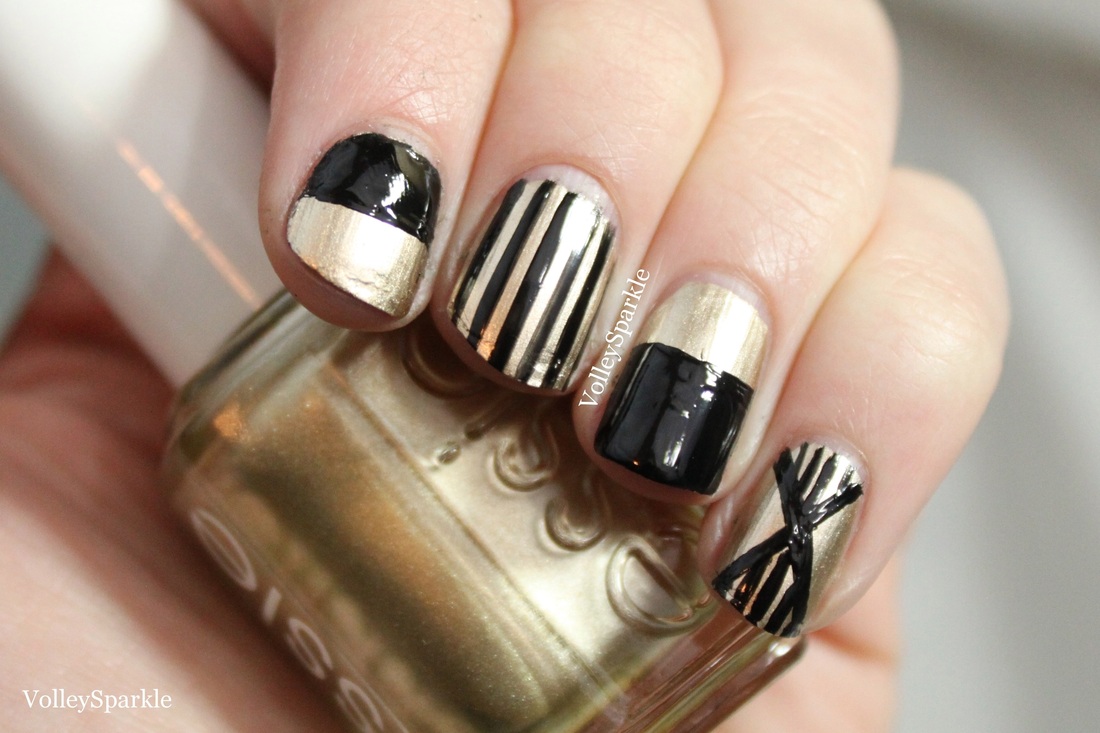
To start off this manicure I used a metallic gold, Essie Good As Gold. For a contrasting effect, I suggest using a metallic polish as the base. I used a different design on each nail, but you could do all the nails the same or just have a design on one accent nail. For two of the nails I filled in half of the nail with black. On the middle nail I used a black nail art polish to draw vertical stripes. I painted an X on the pinky nail and then filled in the top and bottom with vertical stripes. I finished it off with the Out The Door top coat. 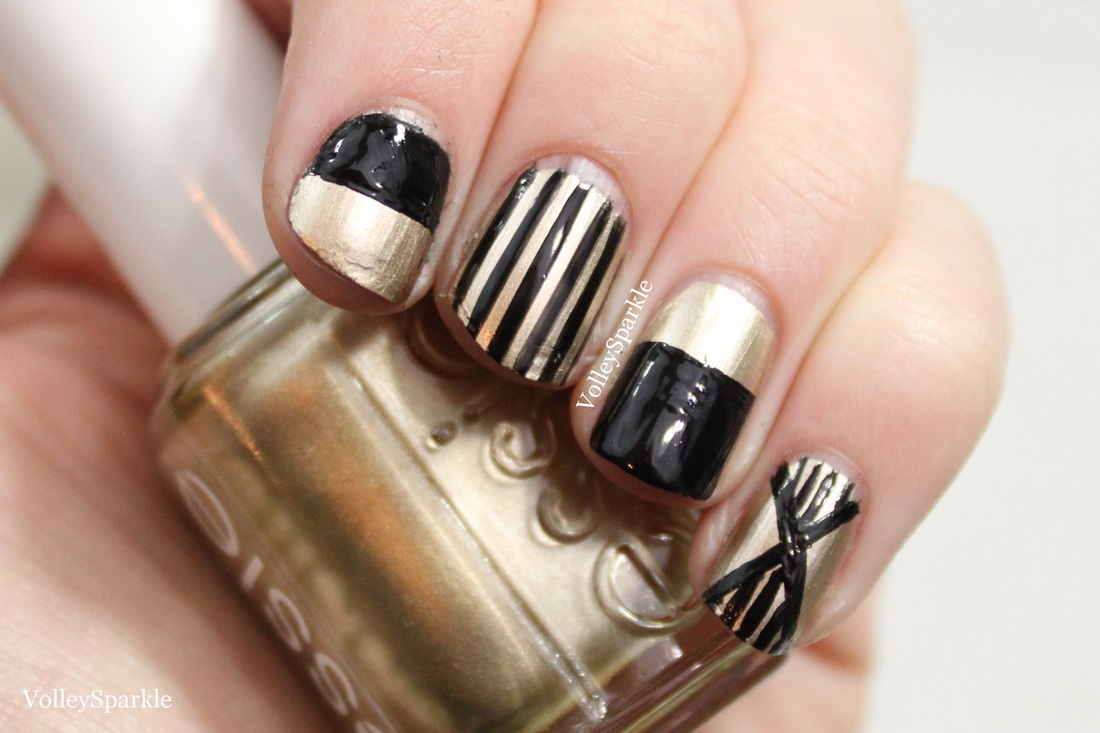
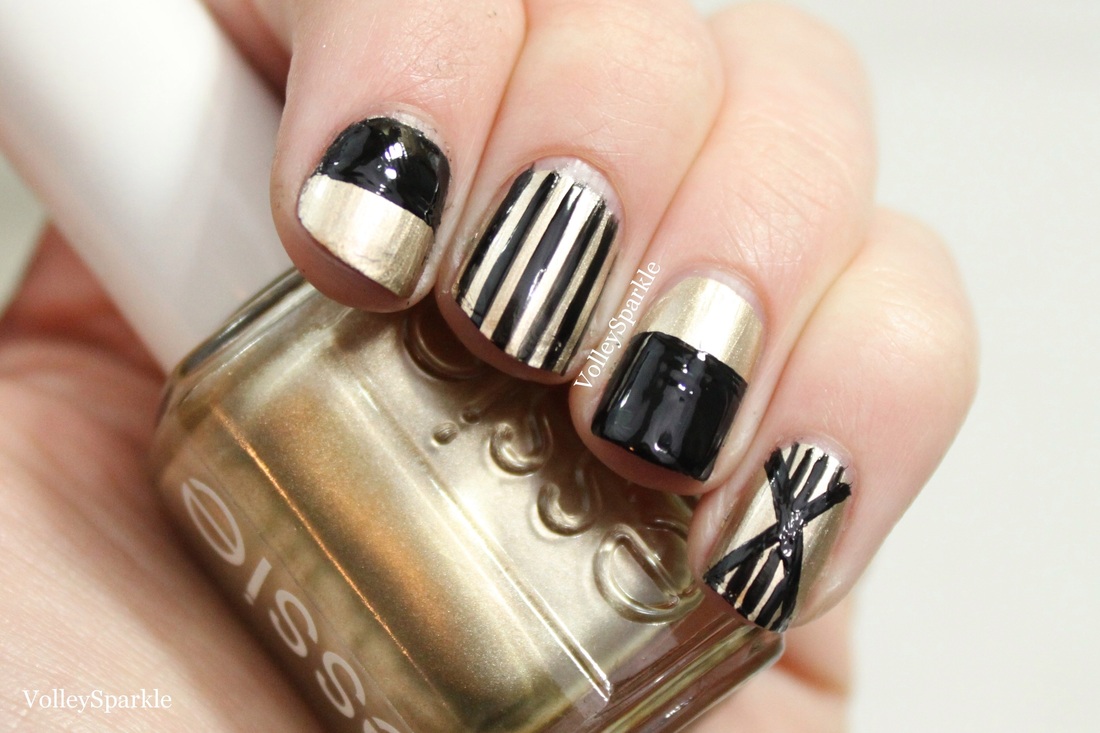
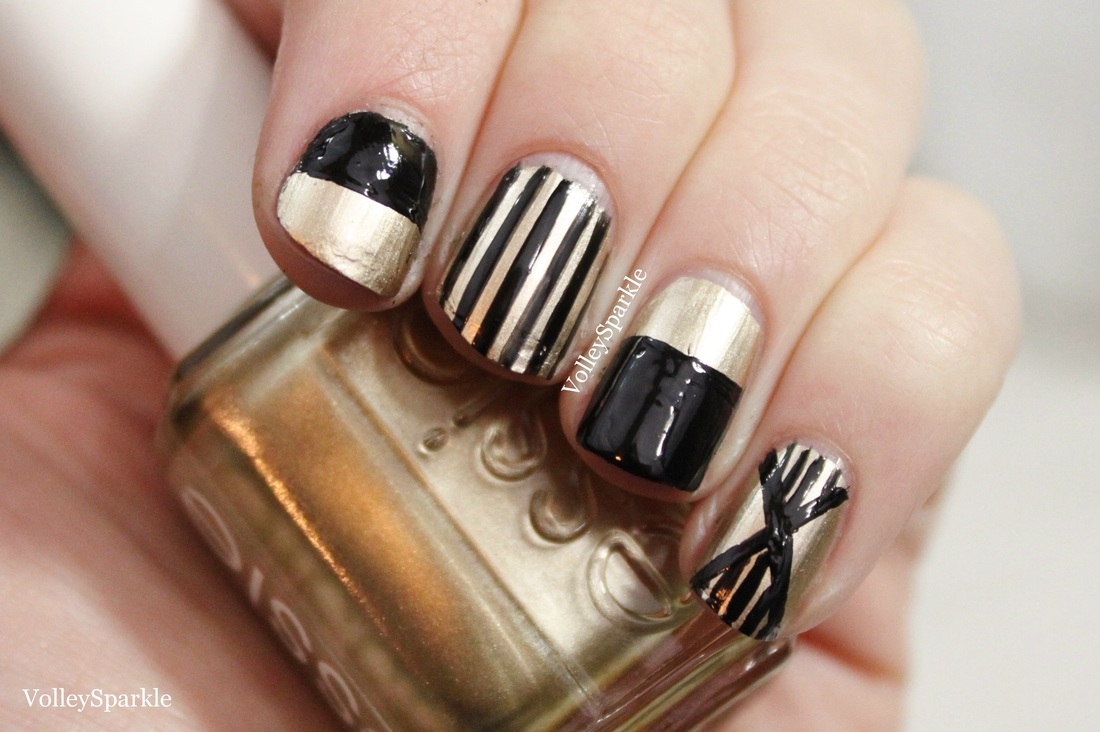
XOX ♥
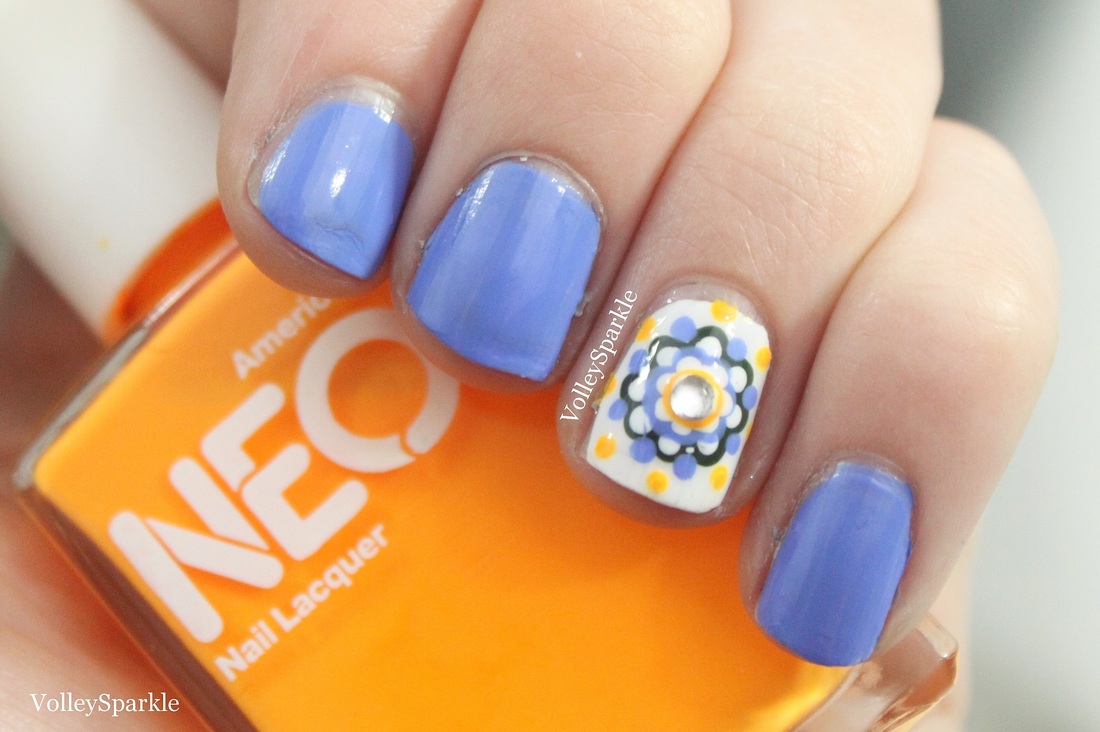
I love drawing mandala designs, so I had to figure out a way to do them on the nails! It's not quite as detailed on the nails, but it still creates a very cool kind of floral look. 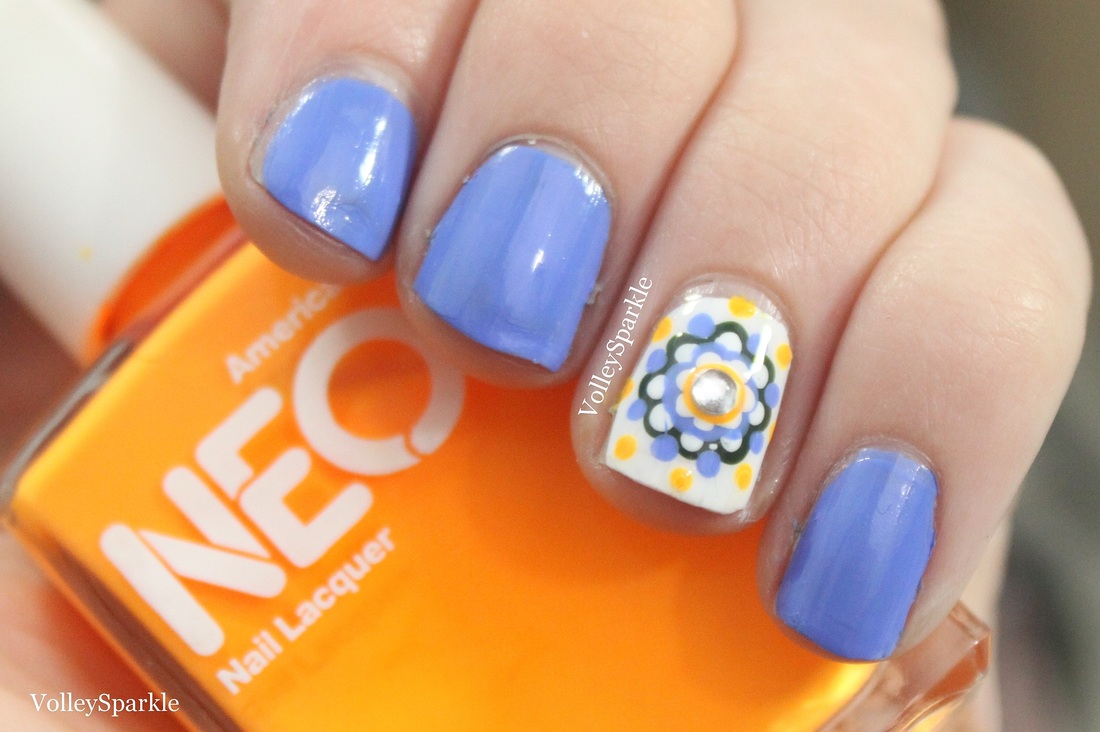
For the base of the nails, I used Milani Power Periwinkle on all the nails except for the ring finger, which I used OPI Alpine Snow. Once the ring fingernail has dried, I moved on to the mandala design. Darker colors will work best for the outer "ring", I used Zoya Hunter. Using a large dotting tool, I drew a circle of large dots around the nail. You could make the circle somewhat small like I did, but I also think it would look cool if you filled the width of the nail. Once the green dried, I used the dotting tool with Alpine Snow inside of each of the green dots. For the next "ring" I used Power Periwinkle, this time putting the dots in between the green dots. Once it dried I applied the white dots on the inside. For the last "ring" I just created a very large dot with American Apparel Neon Orange and applied a clear rhinestone to the center when the polish got tacky. For the finishing touches I added a small dot of the periwinkle in between the green dots and I added little orange dots above each green dot. And of course, use a top coat to make sure the design doesn't have a bumpy look. 
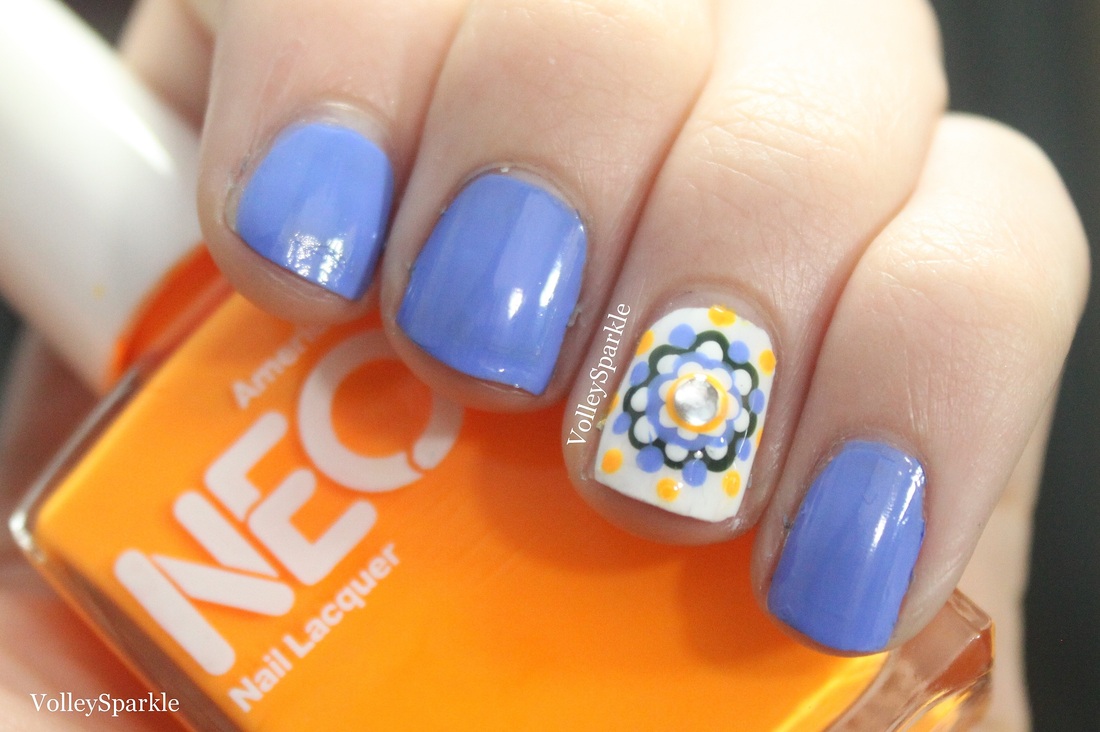
XOX ♥
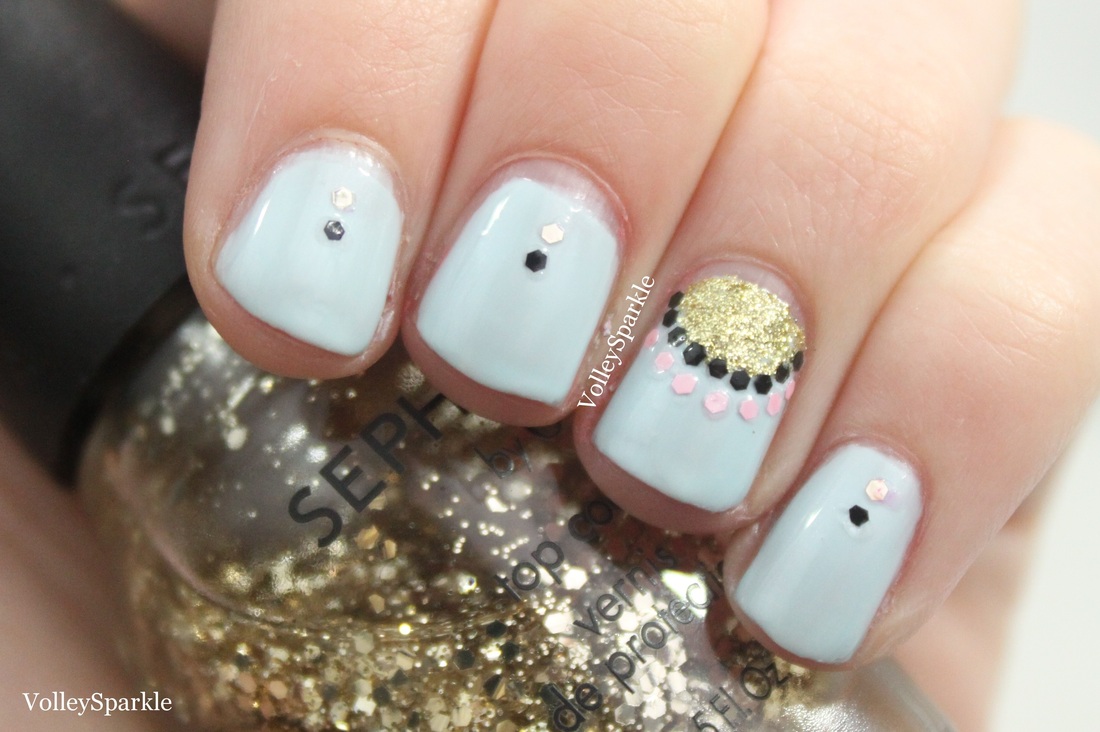
Today I have a spin on the classic half moon manicure that is actually much easier to do than it looks! Start off by painting all your nails with one color, I used Sally Hansen Xtreme Wear Breezy Blue. For the half moon, I suggest using a glittery polish, I used Nails Inc Chelsea Enbankment, but you could choose whatever polish you want. The edges of the half moon don't have to be perfect, which makes this manicure simple. Use hexes from a glitter polish, I used Sally Hansen Xtreme Wear Carnival, and a dotting tool to outline the half moon. I also chose another color of hexes and added another outline, but not as dense as the first one. To give the other nails a bit of design, Use the half moon color to make a dot towards the cuticle (I used a hex from Sephora OPI Only Gold For Me) and a hex that you used in the design right above. Be sure to seal in the design with a top coat as well! 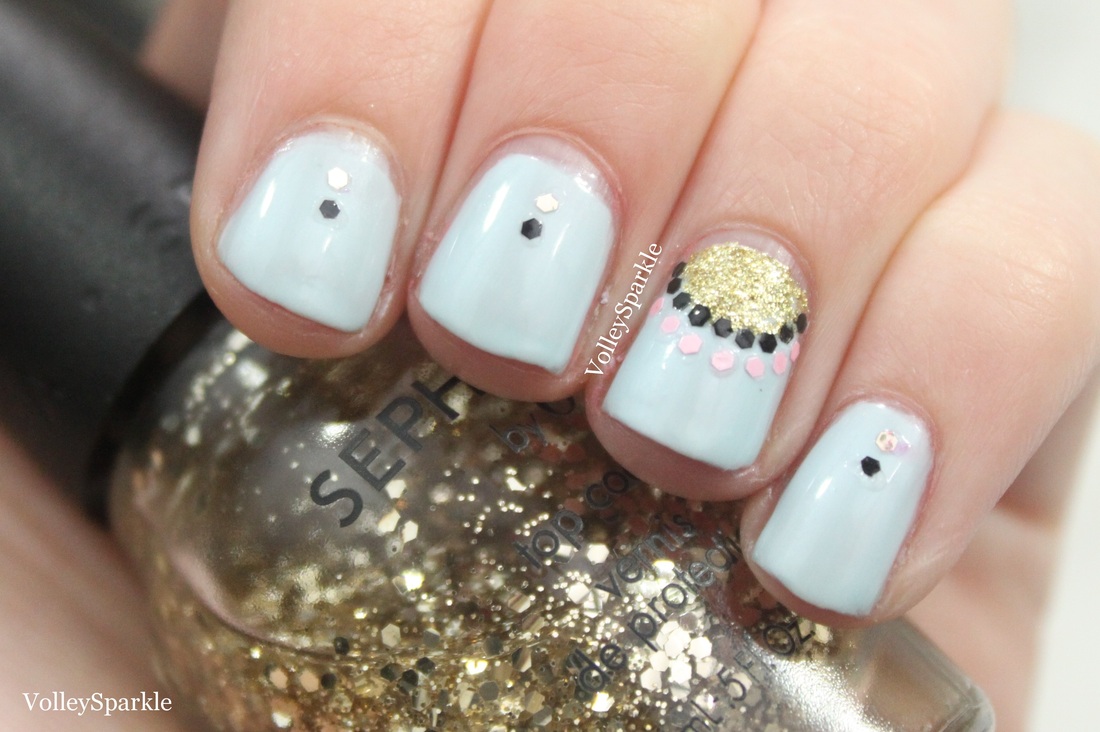
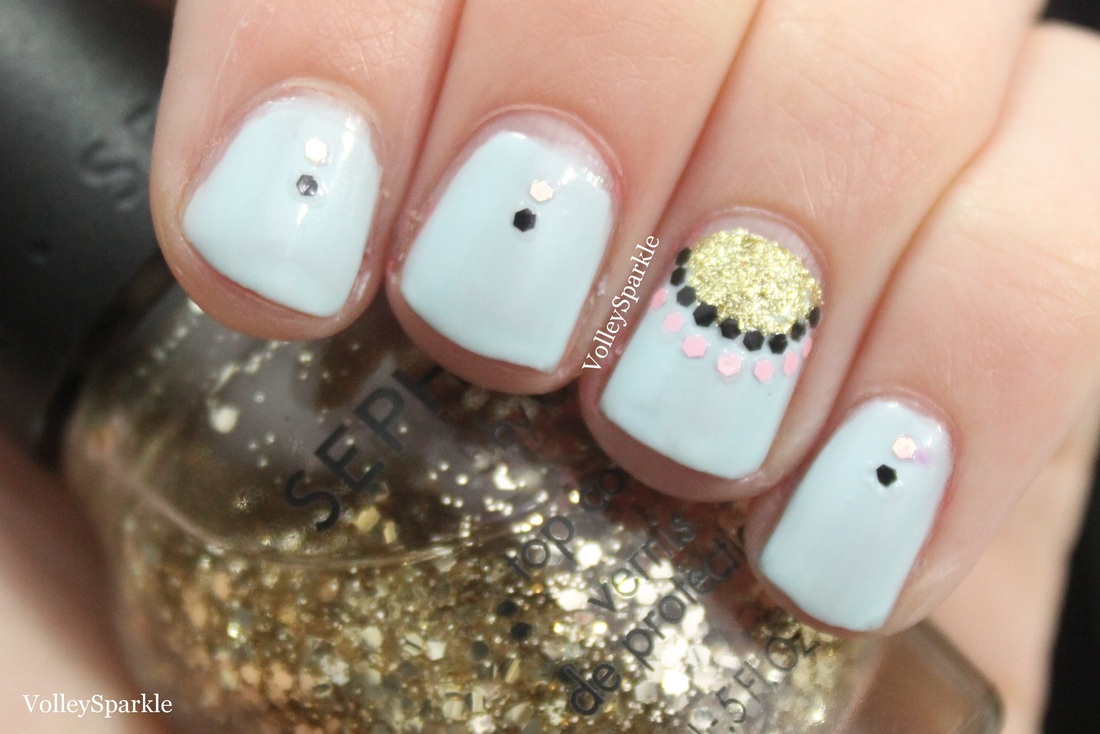
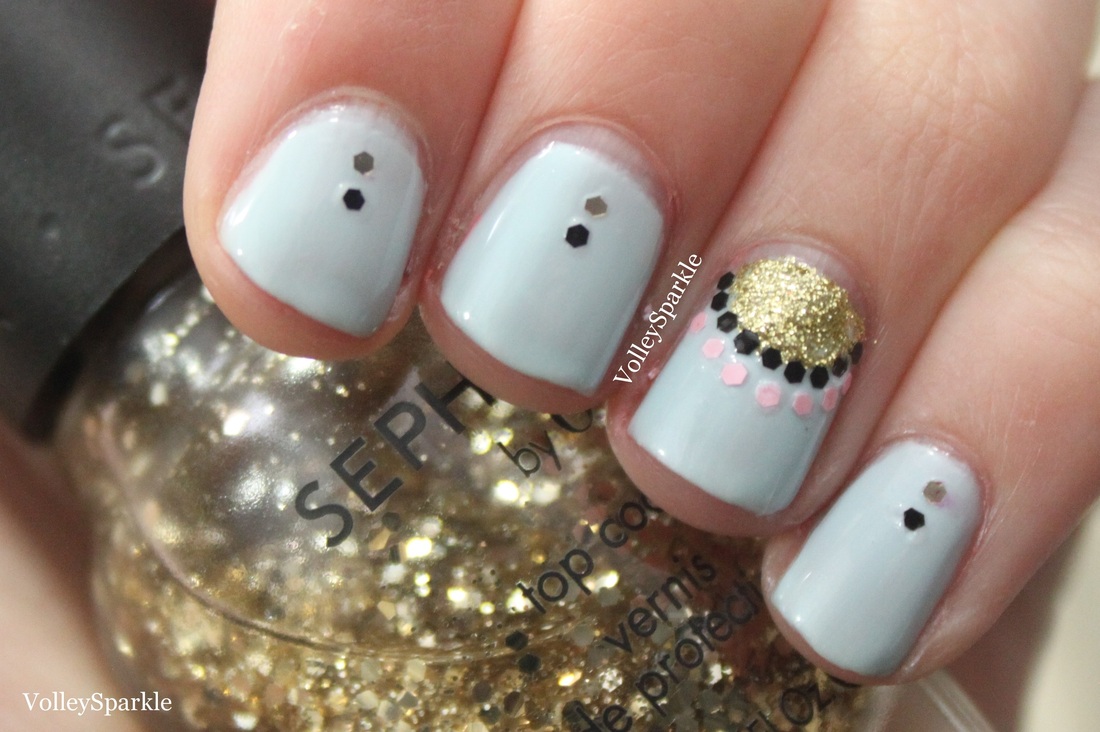
XOX ♥
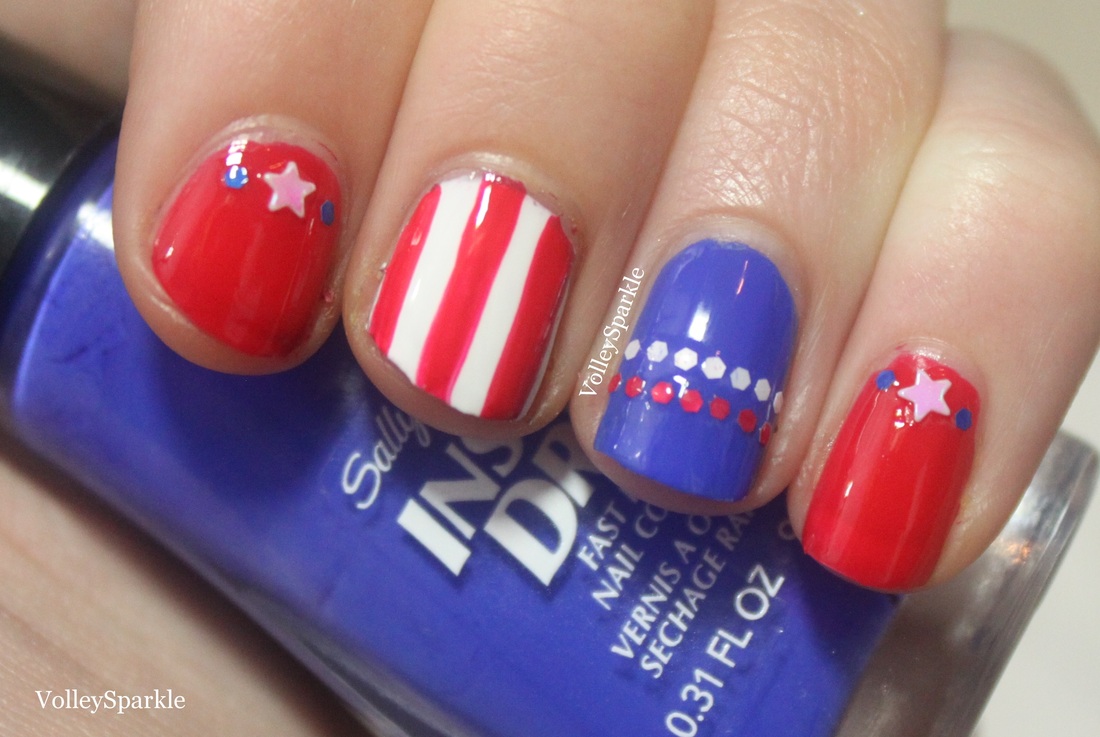
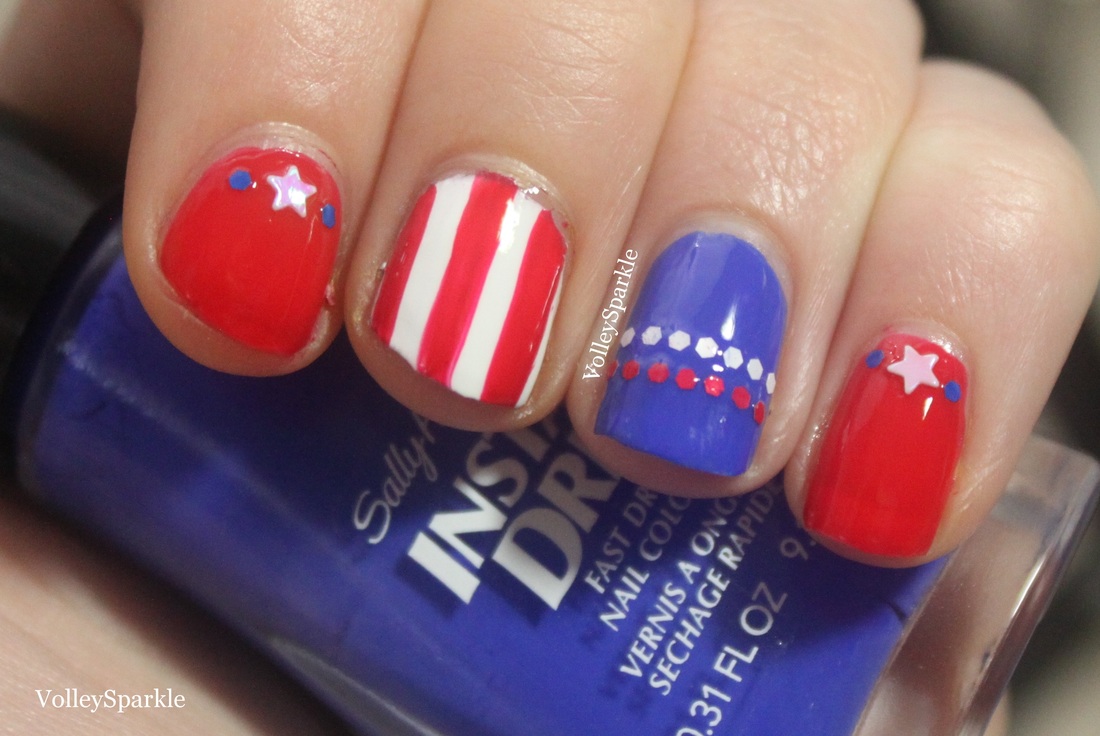
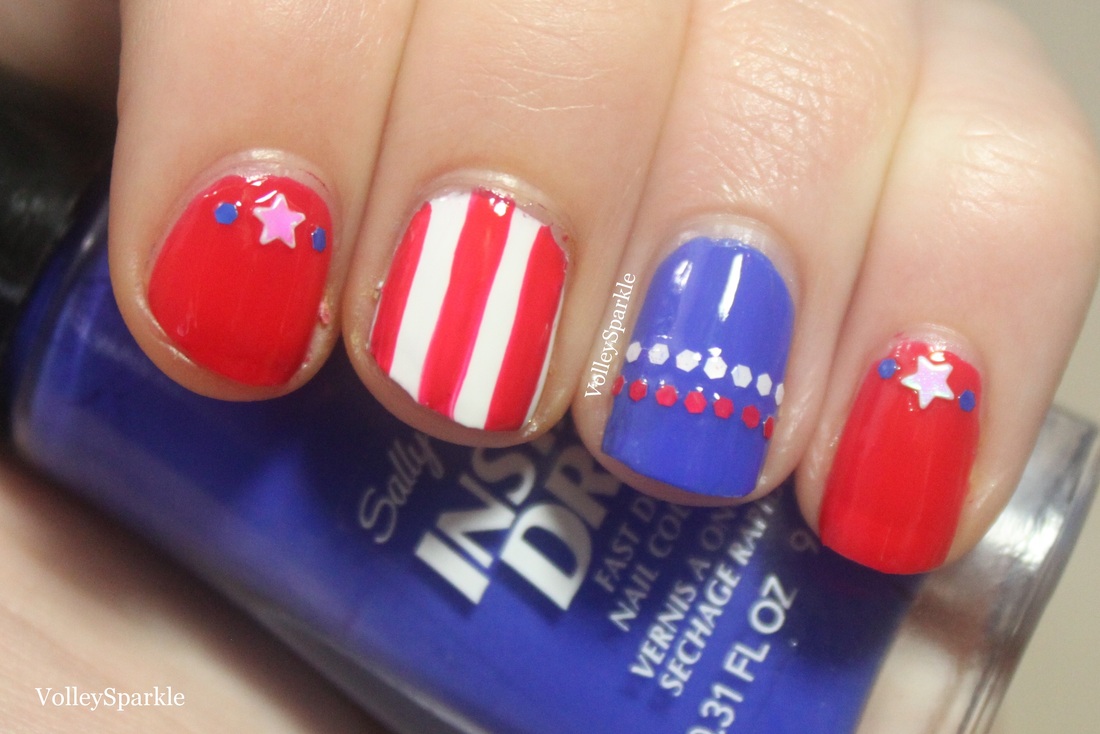
The 4th of July is only days away, so some nail art is in order. For this manicure, I used the following nail polishes; Sally Hansen Xtreme Wear White On (white), dELiA*s Coral Me Pink (red), Sally Hansen Insta Dri In Prompt Blue (blue), Sally Hansen Xtreme Wear Beach Ball (red, white and blue hexes), LA Colors Art Deco Red and the Out the Door Top Coat. 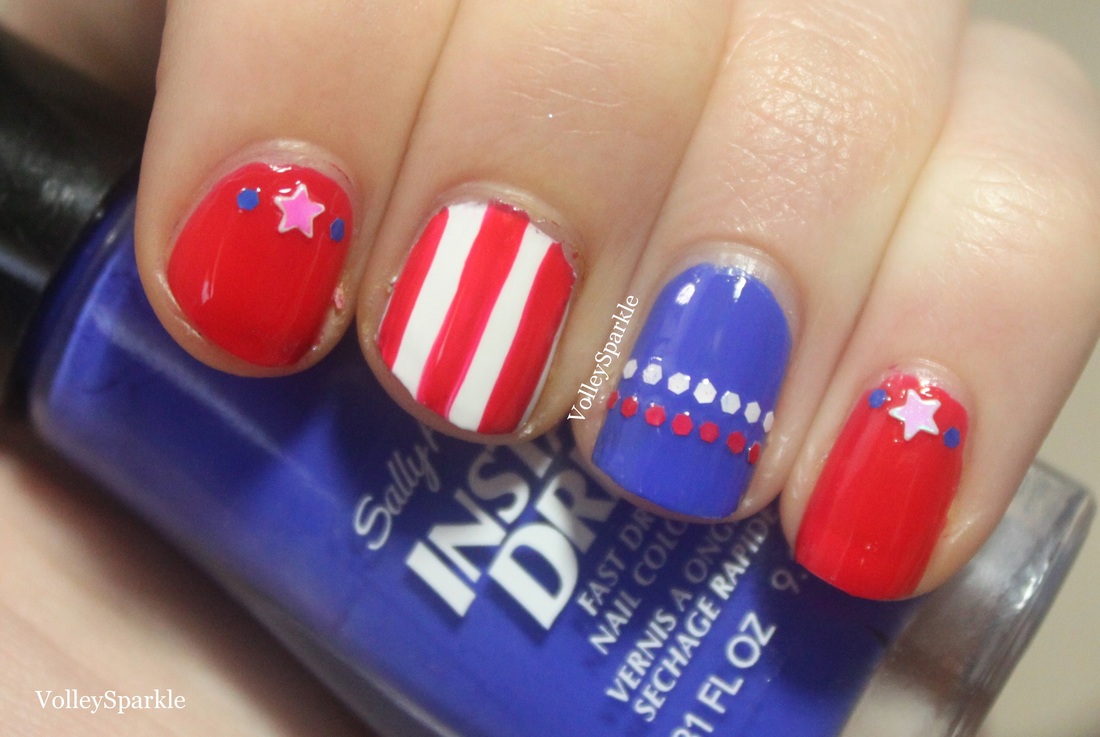
I started off with the base colors as always. I painted the index and pinky nail red, the middle nail white and the ring fingernail blue. After the white base dried, I painted three red vertical stripes. On both of the red nails, I placed a white star at the bottom of the nail (using a top coat) and two blue hexes (from Sally Hansen Beach Ball) on either side of the star. I've really been liking glitter placement nail art lately, so I chose to do one line of red hexes and one line of white hexes on the blue nail. As always, I finished off all the nails with a top coat. 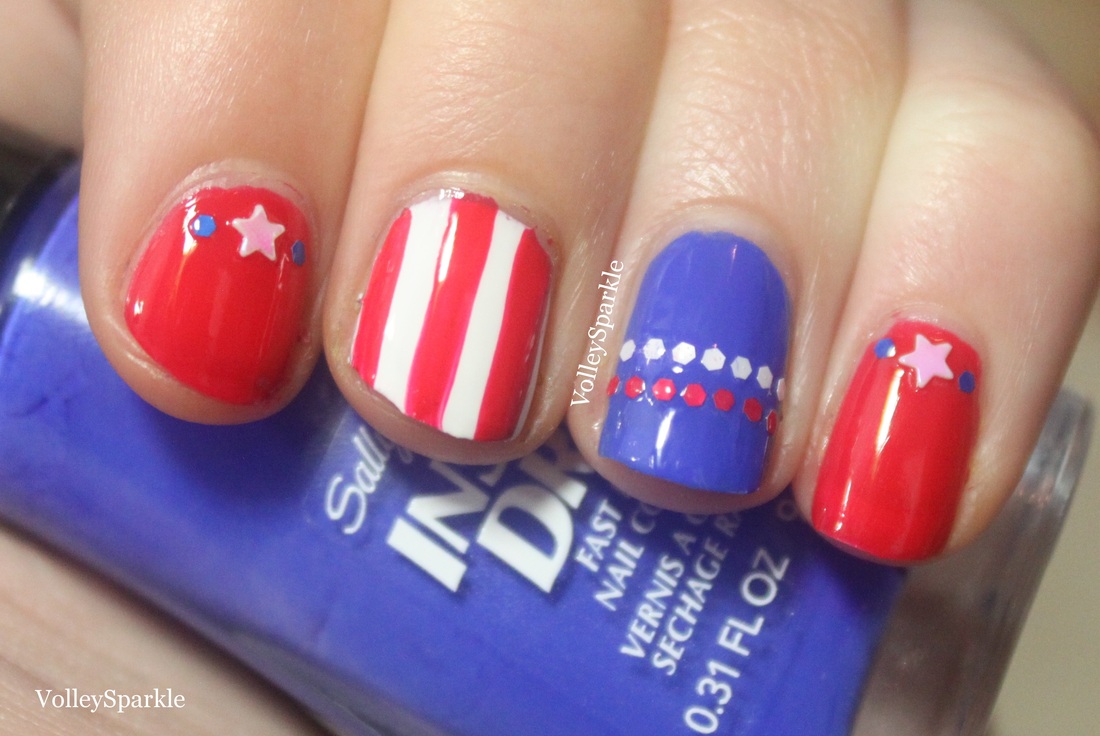
XOX ♥
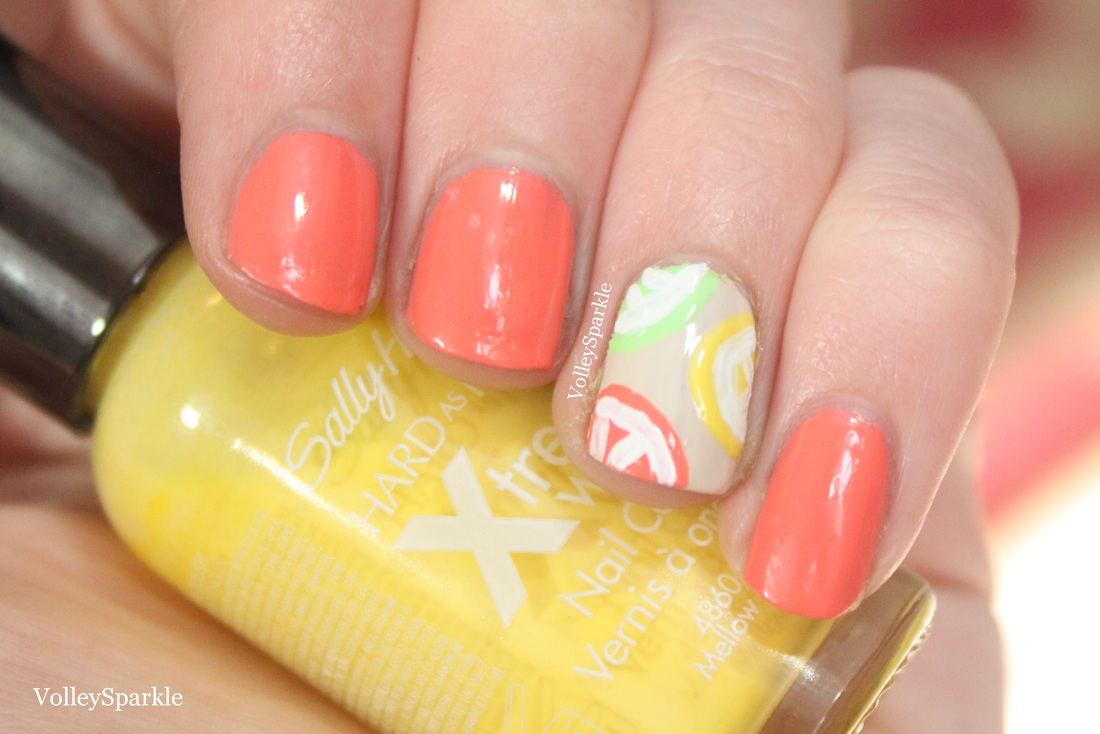 Today I decided to go with a quick and easy design that's perfect for summer. The orange is the Barry M Gelly Hi-Shine Papaya, the ivory is OPI My Vampire is Buff, the green is Pop Beauty Nail Glam in Loud Lime and the Yellow is Sally Hansen Xtreme Wear Mellow Yellow. I used an acrylic paint for the white. Since I wanted the design to be simple, I just made the citrus circles with the nail polish brush. Once the circles dried I used a small nail art brush to draw the lines in the citrus. I also finished all the nails with a coat of top coat. 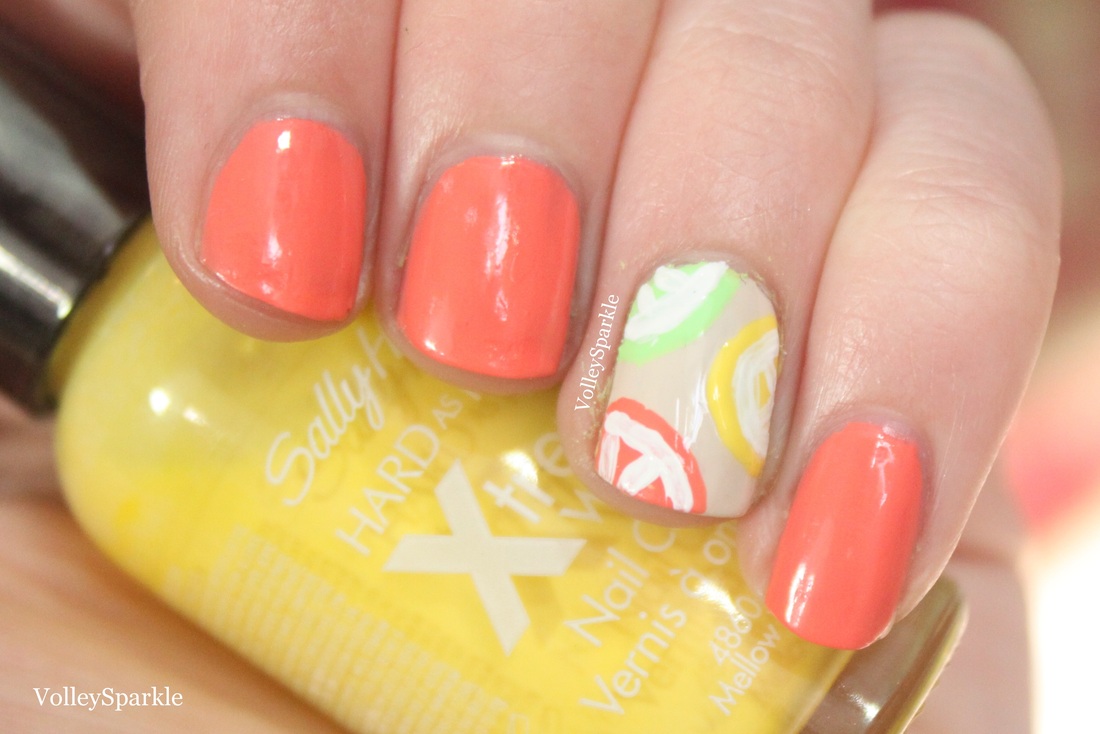  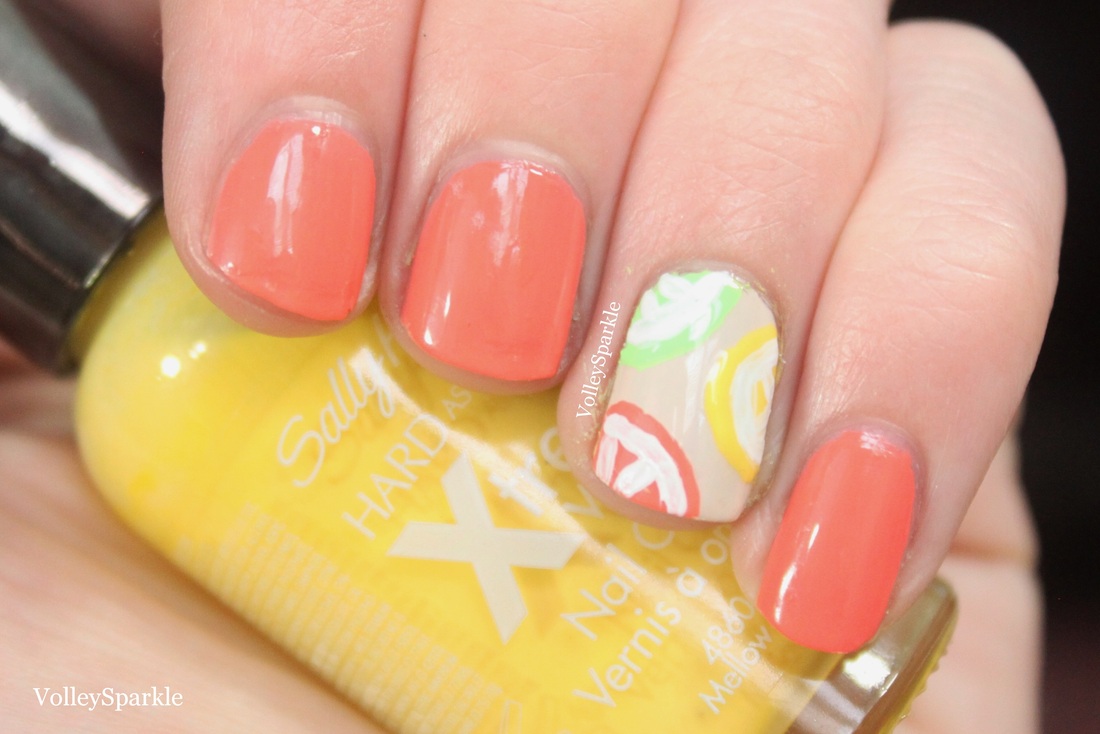 XOX ♥
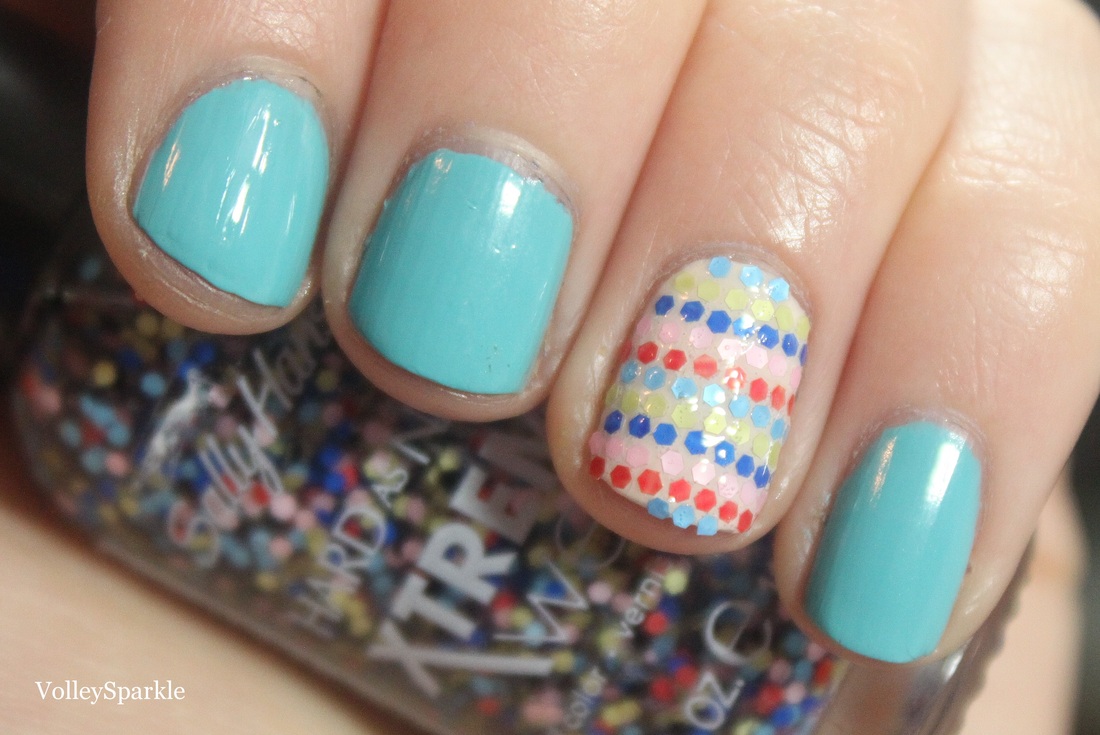
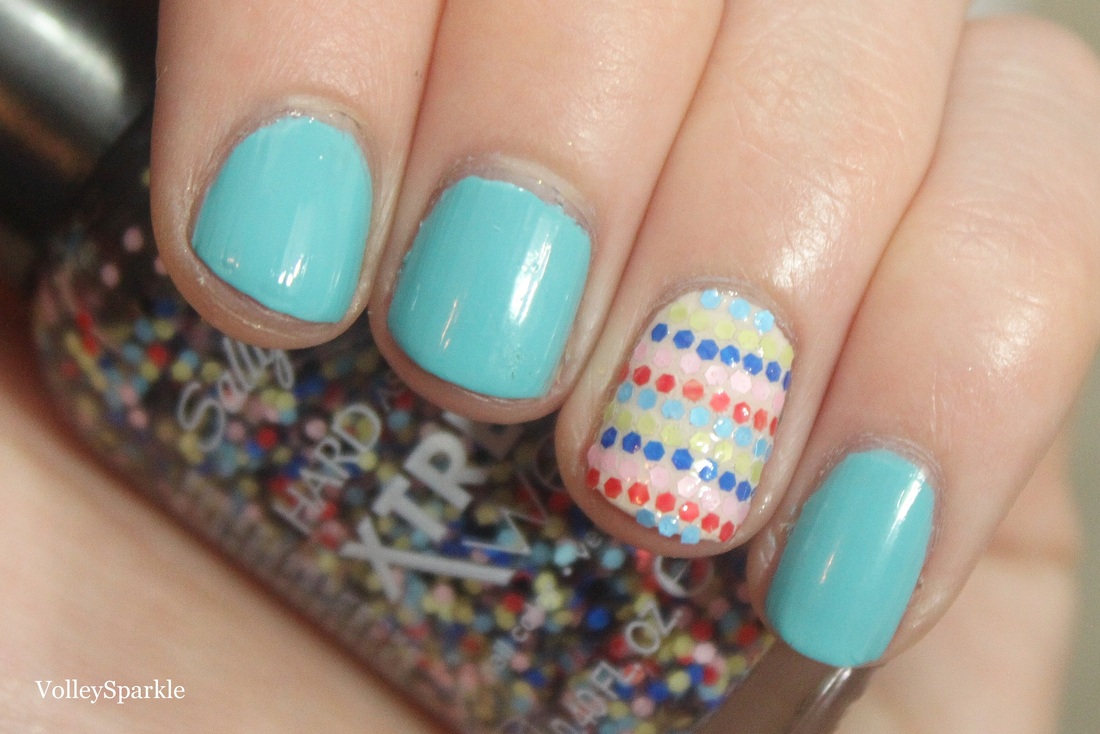
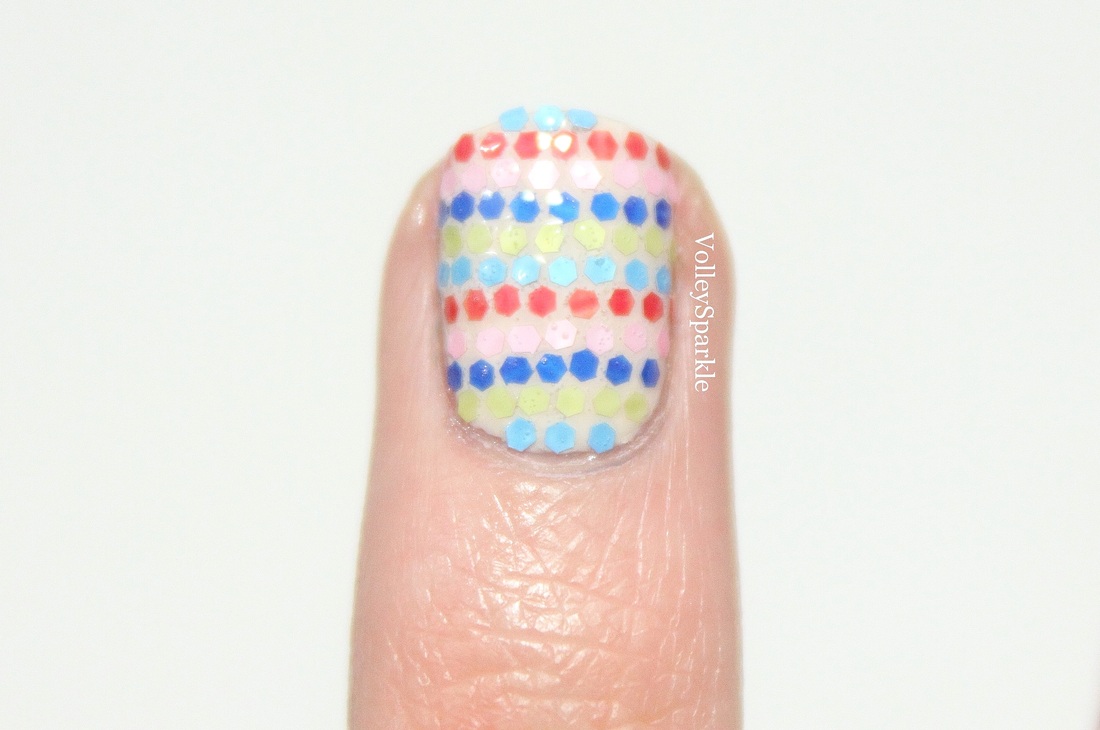
Today I have an interesting newer style of nail art to share with you, glitter placement! This design can be tedious and take some time, but I am happy with the results and it actually had a nice wear time on the nail. The blue is Essie In The Cab-ana and the base on the index finger is OPI My Vampire is Buff. All the hexes I used are from Sally Hansen Xtreme Wear Carnival. To apply the individual pieces from the top coat, I pulled out the brush and used a cuticle stick (a toothpick or dotting tool could also work) to pick up the piece of glitter and stick it to the nail. I filled each row with the same color and used all the colors in Carnival except for black. I sealed off the design with the Out The Door top coat. 
XOX ♥
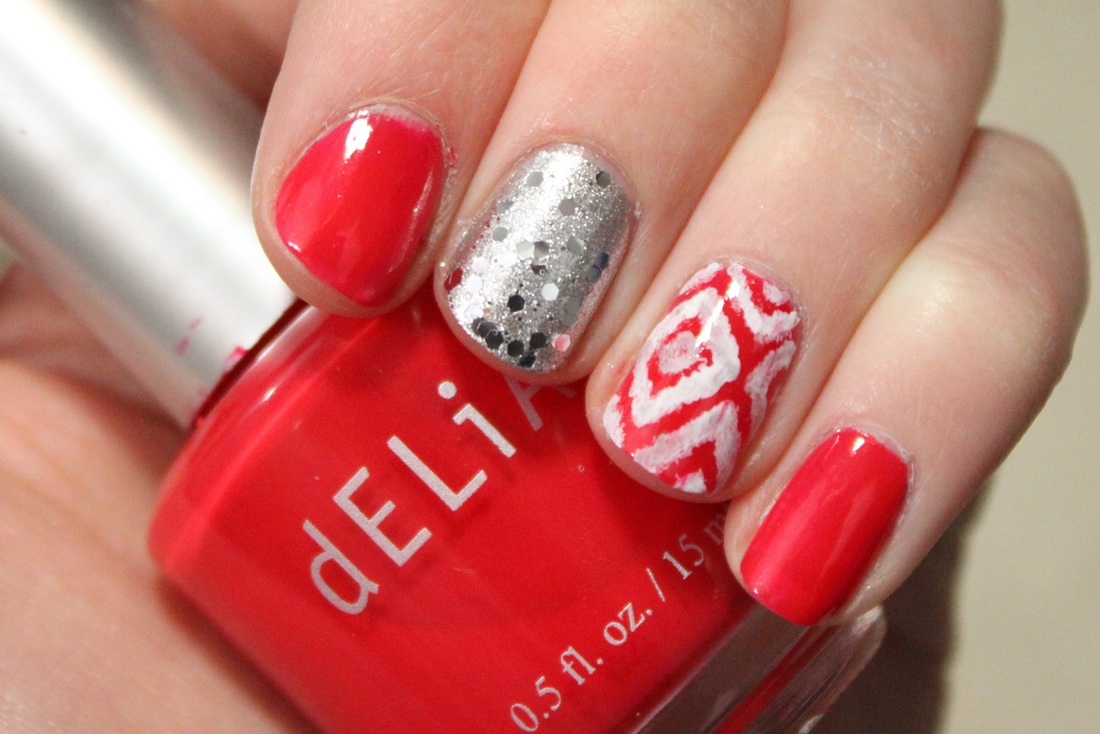
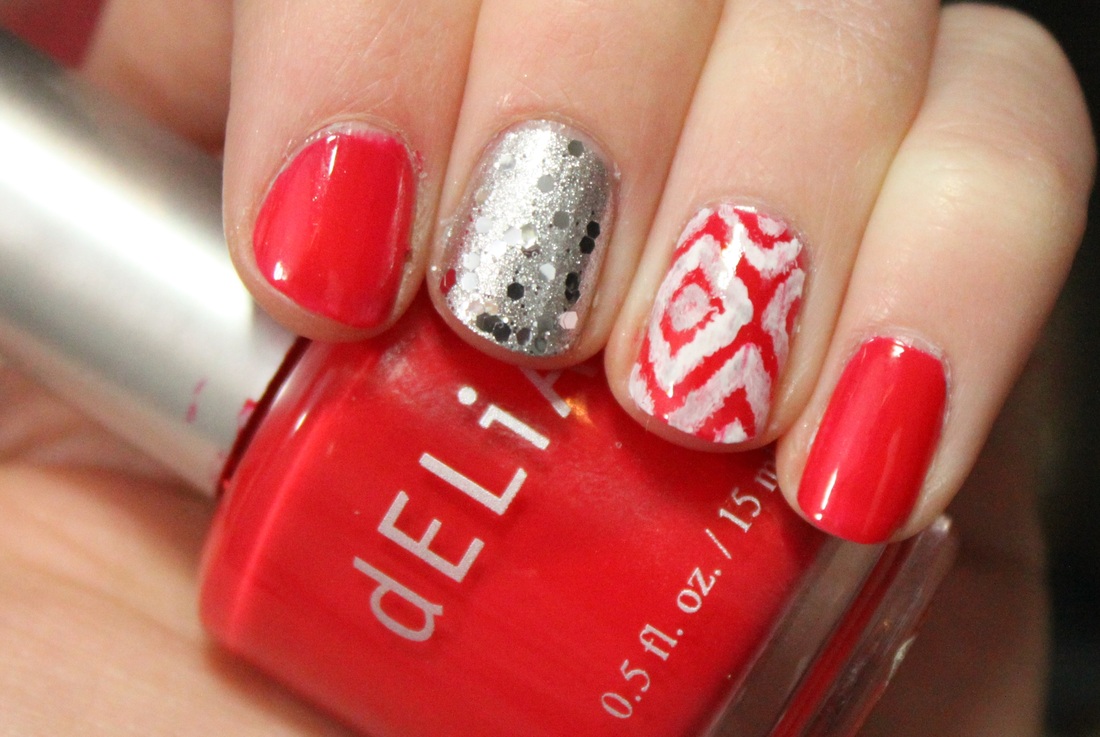
Products Used: dELiA*s Coral Me Pink (Red), Sally Hansen Xtreme Wear Celeb City (Silver), Sephora by OPI Flurry Up (Silver Glitter), Artist's Loft Acrylic Paint in Titanium White, Simply Simmons Flat Shader 0 Paintbrush. 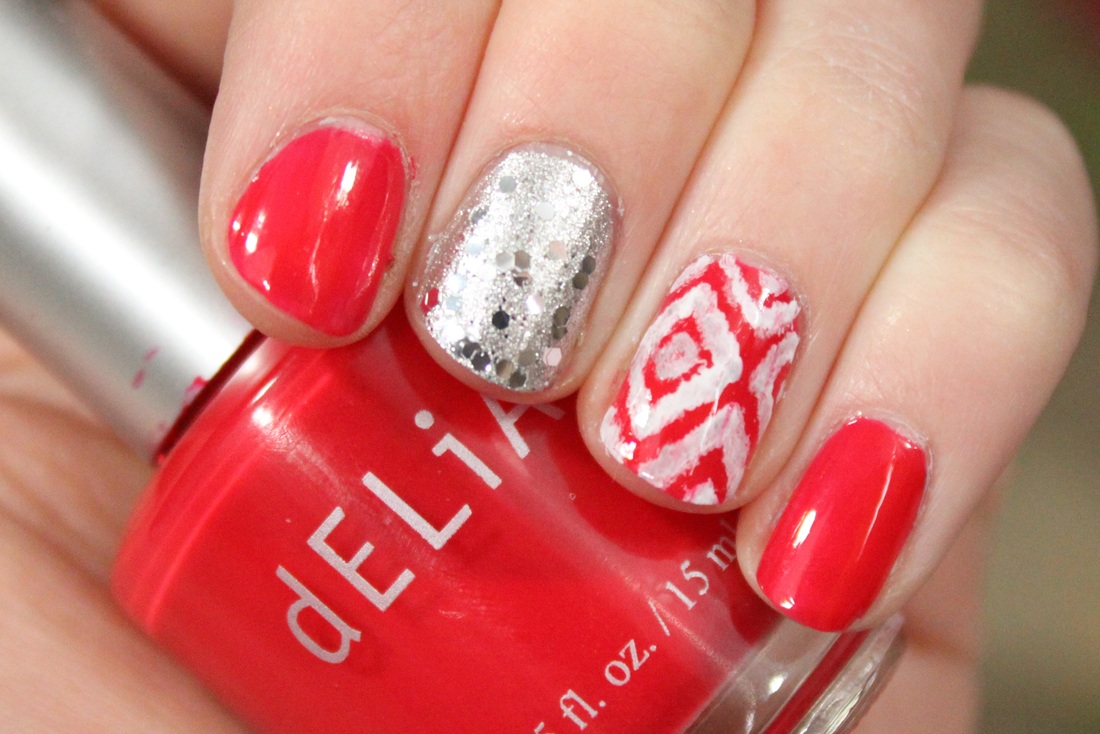
I've got some fun nail art today that's actually pretty easy to do! As always, I started off with the base color, red on all the nails and silver on the middle finger. I topped off the silver nail with a chunky silver top coat and the pinky and index finger with a regular top coat. For the ikat print nail, I used a paintbrush and white acrylic paint. To create the design, I dipped the corner of the brush in the white paint and painted a diamond on the nail with a jagged brush stroke. I added a smaller diamond inside the first one and continued to paint the design all over the nail. Once the design was done, I sealed it with a top coat. 
XOX ♥
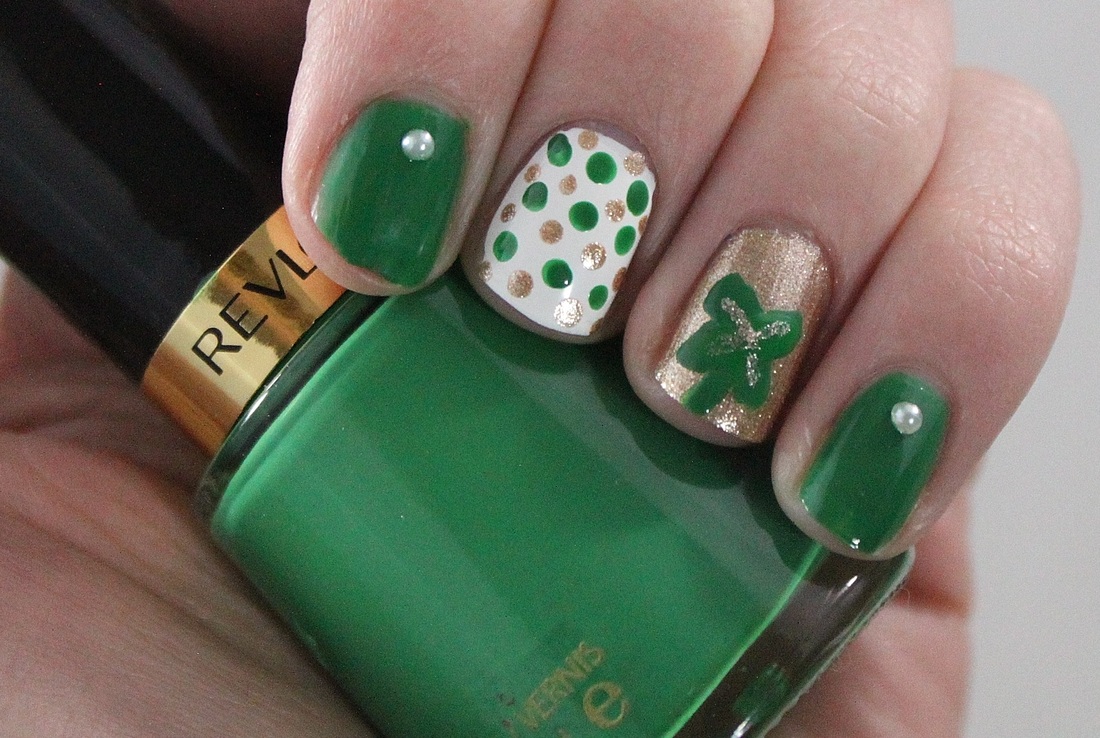
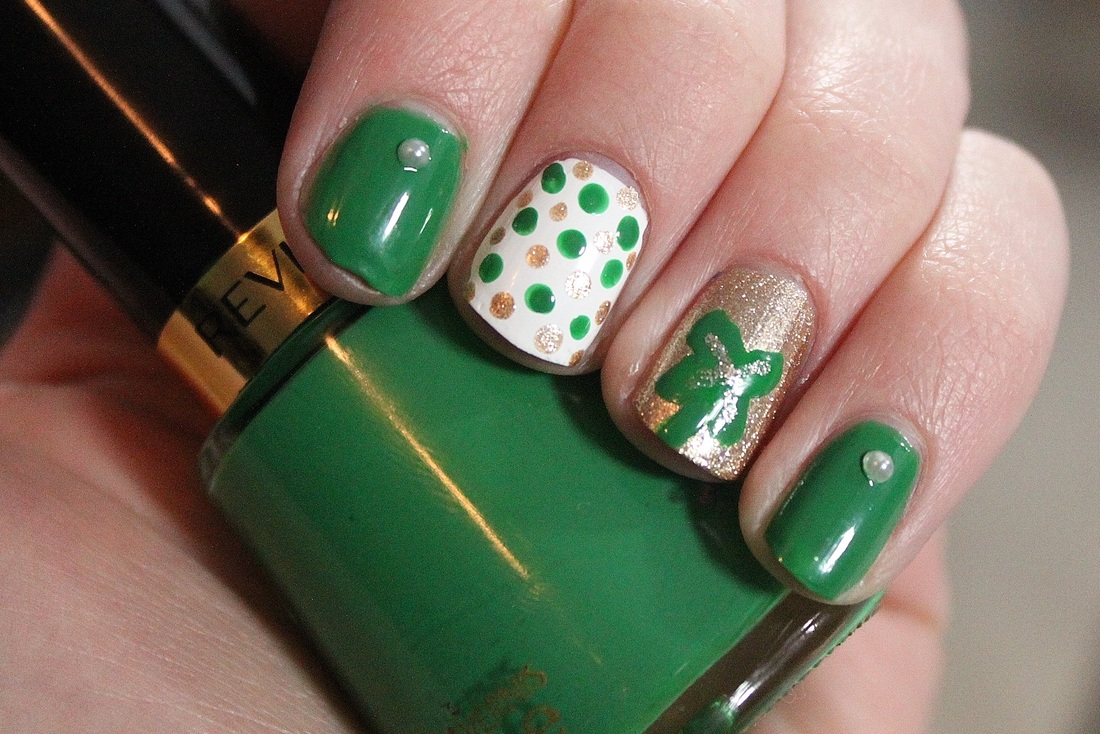
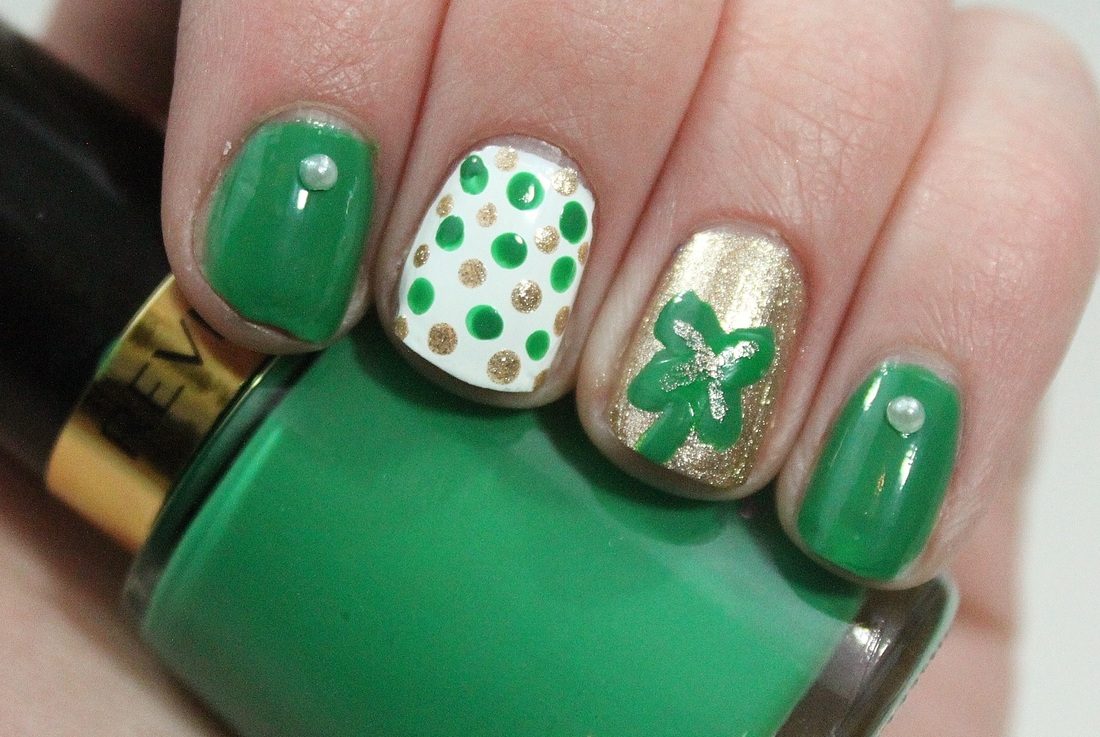
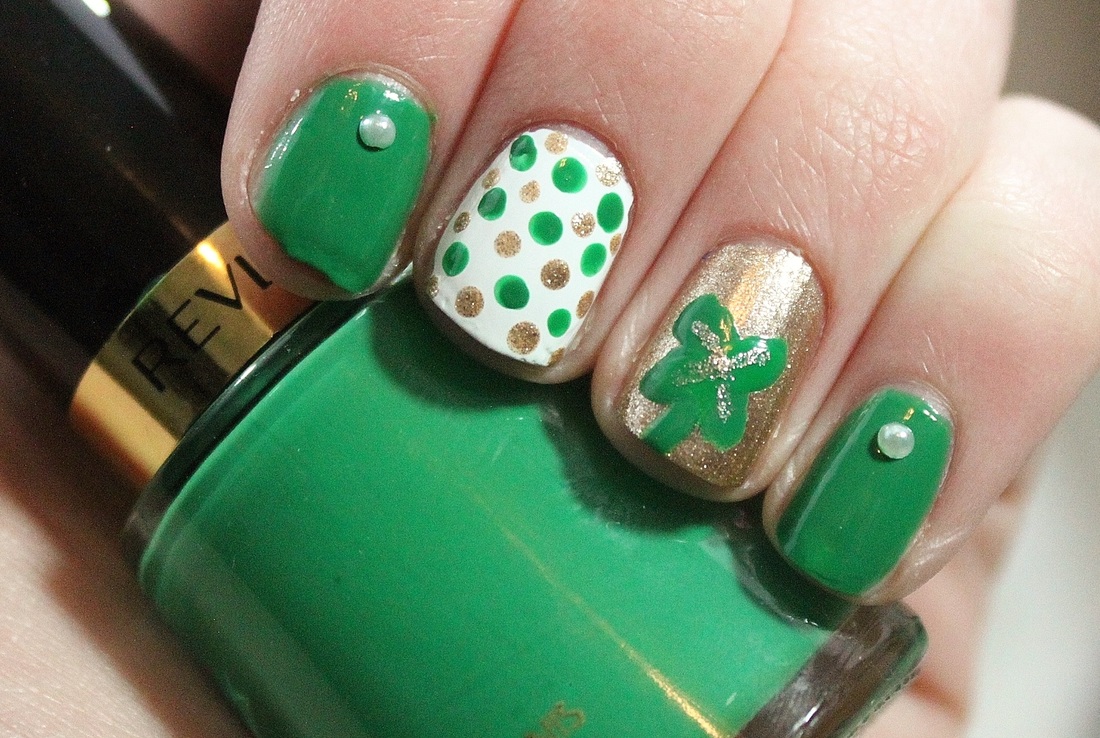
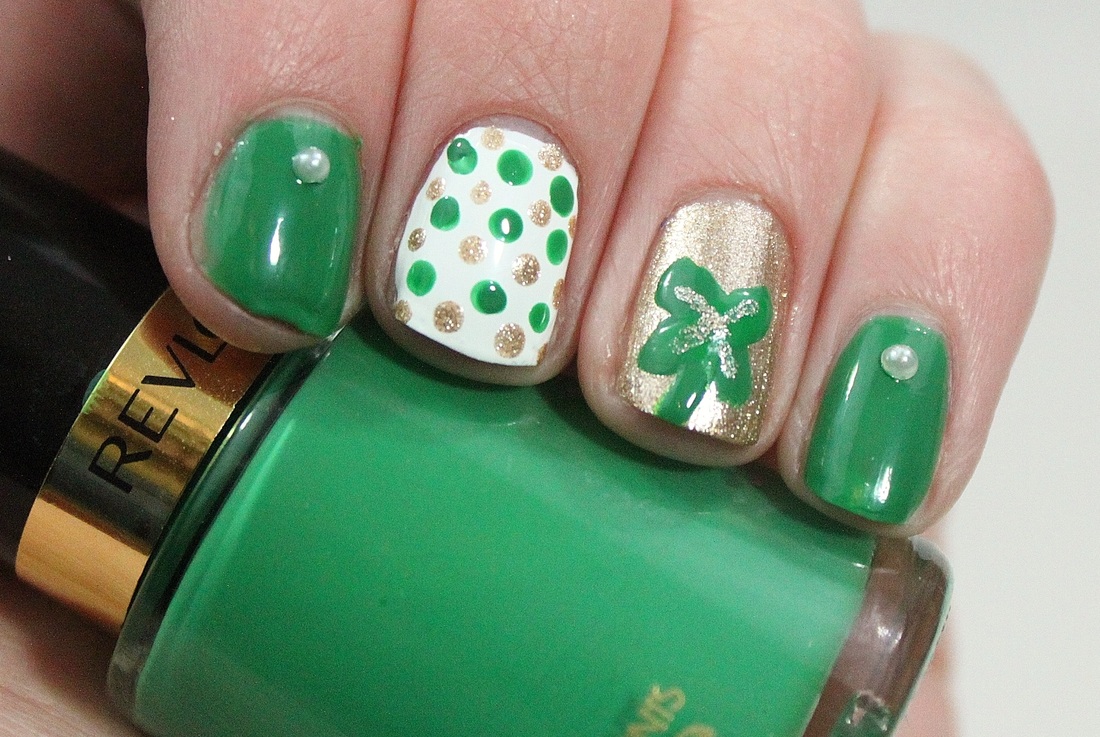
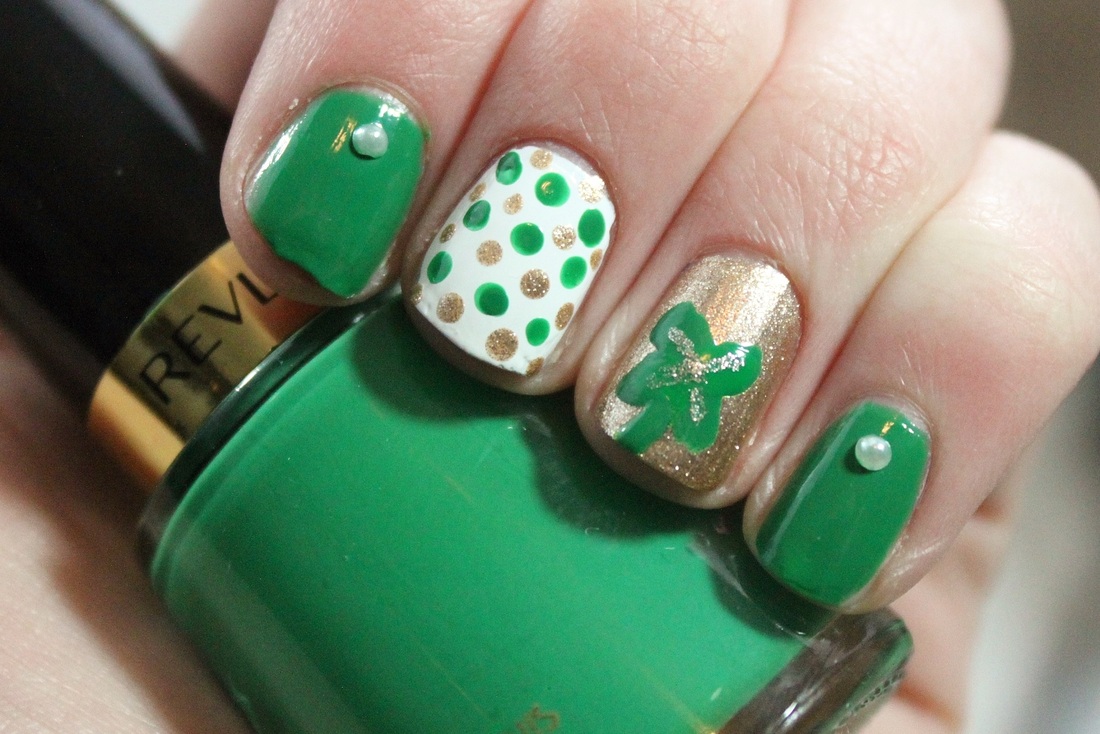
Today I have a simple nail art look for St. Patrick's Day to share with you! Polishes Used: Revlon Posh (green), Sally Hansen Xtreme Wear Golden-I (gold), Sally Hansen Xtreme Wear White On (white). 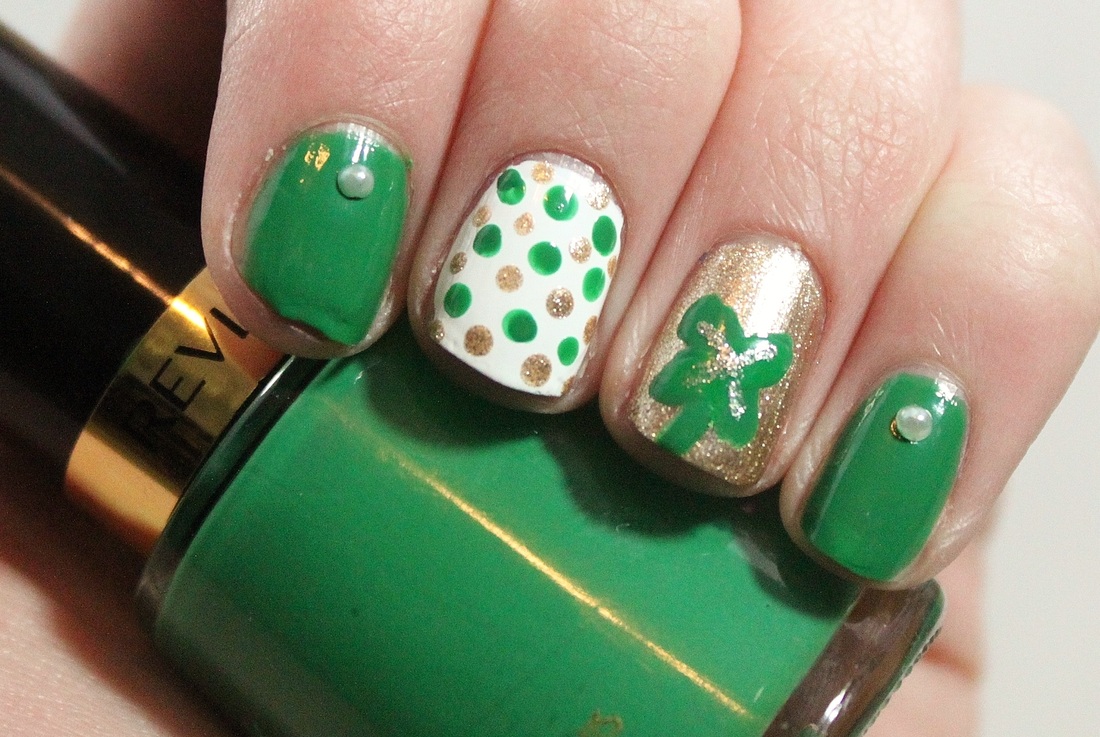
I wanted to create a more simple nail art look and came up with this manicure incorporating pearls, polka dots and of course a four leaf clover. Although I am 1/4 Irish, I've never done anything for St Patrick's day, but I love doing nail art! 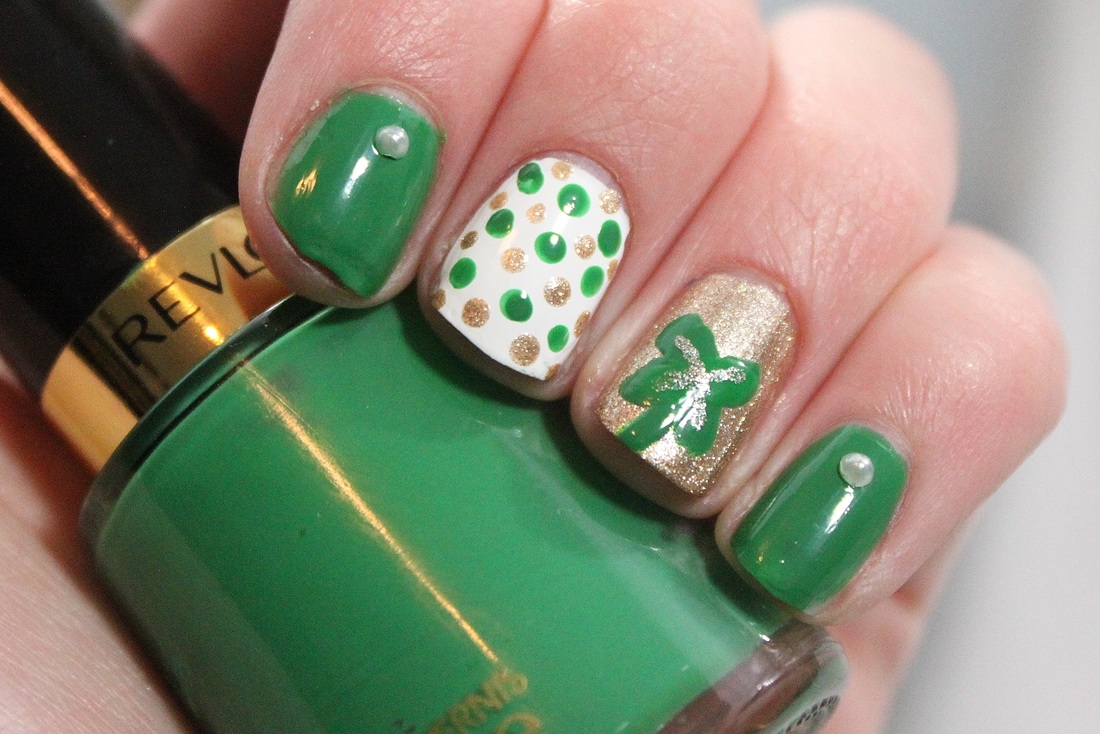
As always, I started off this nail art with the base colors. I painted my index and pinky nails green, middle fingernail white and ring fingernail gold. I finished off the green nails by adding a small white pearl to the base of the nail, but you could just leave them plain. For the polka dot nail, I used the large end of a dotting tool to create green dots and in between the rows I used the small end of the dotting tool for gold dots. For the clover, I used the green polish to carefully make four connected ovals to be the leaves. I then used a small bit of the polish to make a stem. You can stop here, but I used the gold polish again to make an X in the middle of the clover. As always, finish off the manicure with a topcoat! 
XOX ♥
|
Nail Polishes Swatches
All
Archives
June 2016
|
 RSS Feed
